Reports
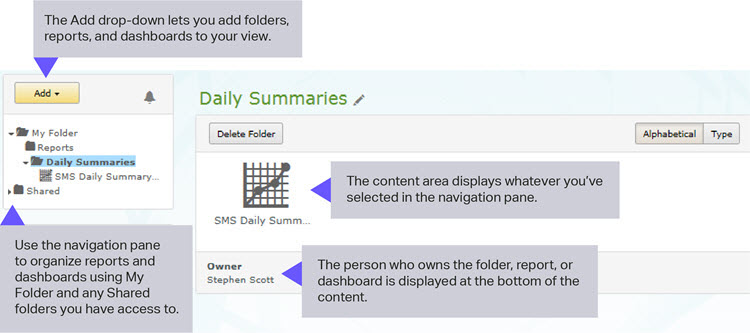
The main page of Reports consists of two parts: the navigation pane and the content area. The navigation pane contains an Add button for adding reports, dashboards, and folders to your view, while the content area displays what you've selected in the navigation pane.
All custom reports and dashboards have an owner, and the owner's name displays below the report or dashboard. You can only view custom reports and dashboards owned by someone else if that person has shared them with you. This page provides some information about sharing, but you can find more about permissions here: How Permissions Work.
Using the navigation pane
The navigation pane lets you add and manage folders, select reports and dashboards to view, and link to additional resources, including legacy OpenMarket reports. The navigation pane contains:
- The Add drop-down button for adding folders, reports, and dashboards to your view
- My Folder for storing the reports and dashboards you create that you want to keep private
- Shared folder that stores the reports and dashboards you and other users share
- Legacy Reports folder that stores reports such as the Message Activity Reports (MAR) and Preview Reports (Note that you will not see this folder if you are a new customer as of 22 August 2016)
- Links to administrator tools (only visible to users with administrator permission on their user account)
- Additional resources such as the service availability report, the user guide, and the Support Request form
Selecting the Add drop-down displays reporting objects you can add to your view.

Selecting a folder in the navigation pane displays the contents of the folder.

Selecting a report displays information about the report and a list of report instances.

Selecting a dashboard displays the widgets that are on the dashboard.

How My Folder works
You'll want to store reports and dashboards in My Folder when you want to keep them private.
When you log in to Reports for the first time, expect My Folder to be empty. To add a folder, report, or dashboard to My Folder, select the Add drop-down button. Further down this page are details about how to add folders and how to create custom reports and dashboards.
How the Shared folder works
The Shared folder contains other folders that store reports and dashboards being shared with other users in your company. For example, let's say you create a custom report and want to share it with one or two colleagues. You would create a folder in Shared, move your report into it, and then set permissions on the folder and the object. You can grant Can View permission to other users, or Can Edit permission.
For more information on permissions and sharing, see How Permissions Work.
Adding folders, reports, and dashboards
You'll use the Add button to add folders, reports, and dashboards to your navigation pane.
When you add these objects remember that only you can see those that you store in My Folder. So when you want to create a custom report or dashboard, we suggest storing it initially in My Folder. If and when you're ready to share it with others, you can move it to a Shared folder and assign others permission to view and/or edit it.
Reading notifications
Whenever someone changes your permission to access a shared folder, report, or dashboard, a notification will be sent to you. Similarly, whenever you change the permissions on an object you either own or have Can Edit permission to, any users affected by your change will receive a notification. Notifications are also sent to anyone having access to a data source that OpenMarket has updated. For example, if we add a field to a data source that you have permission to access, then you'll receive a notification about the change. Data source changes may affect your existing reports and widgets.
A badge displays next to the bell indicating how many new notifications you have. Click the bell to display them.

Basic procedures
Add a folder
-
Click Add and then select Folder. This displays the Add Folder pop-up.

-
Enter a name for the new folder (≤ 45 characters) and specify whether to locate it in My Folder or Shared.
When you locate a folder in Shared, it isn't actually visible to anyone until you configure permissions using the Share Settings feature. See How Permissions Work for more information.
- Click OK. The Add Folder window closes and your new folder displays in the navigation pane.

Here's what you can and can't do with a folder:
- You can rename it
Select the folder name at the top of the page and enter a new name. Note that you can do this only for folders that you own or have edit rights to. - You can delete it
Select the folder in the navigation pane and click Delete Folder, and then confirm the action. The really important thing to remember here is that when you delete a folder, everything in it is deleted too. - You cannot move it
You can move a report or dashboard within a folder, but not the folder itself.
Add a standard report
Standard reports are located in a Shared folder named after your company. Your administrator is responsible for sharing these reports, so if you do not see your company folder in Shared, contact the administrator within your organization.
Note: The screen shots shown here may not reflect the complete list of standard reports and widgets available from OpenMarket, as these are subject to change.
-
Click Add and then select Standard Report.
The Add Standard Report page displays. Reports are listed for both the SMS Summary and SMS Detailed data sources.

-
Click the drop-down and select the report you need.
The page will display information about the report, including the data source used, fields included, and fields that are filtered.
- Submit the report.

Those are the only three required steps to add a standard report. There are only a couple of optional properties you can set. For details see Standard Reports.
Add a custom report
The following steps explain how to create a custom report from scratch. You can also create a custom report by copying a standard report.
-
Select Add and then select Custom Report.
The Add Custom Report page displays.
-
Give the report a name and select a data source.
The data sources available to you are those your administrator has granted you permission to use. Once you select a data source the page displays additional properties you can set, as well as fields you can include in the report.
- Select the fields and filters you want to include in your report.
- Specify the schedule and delivery properties, and where you want to store the report.
- Submit the report for processing.
Once you submit a custom report, you're returned to the main page and your report displays in the content area, as shown in the example below. The status of the report will usually display initially as a hourglass, indicating that it is processing or has been queued. If the report fails to process, you'll see a red icon.

For detailed instructions on how to create a custom report, see Create a Custom Report — Detailed Steps.
Add a dashboard
-
Select Add and then select Dashboard.
The Add Dashboard pop-up displays.

- Give the dashboard a name and choose a folder to store it in.

For information about how to add widgets to the dashboard, see Creating and Managing Dashboards.